How to Install a Bolt on Container Lock Box
Installing a bolt on lock box is a lot easier than you might expect. With a few tool that most people have around the house you'll be able to install a bolt on lock box in under 15 minutes. The lock box and container in the picture were provided by OnSiteContainers.com, a company providing storage containers in Lancaster, PA.
Equipment Needed
- Drill with a 5/8 bit capable of going through steel.
- ¾ inch wrench or socket
- Pencil or marker

1. Marking the Right Side Holes
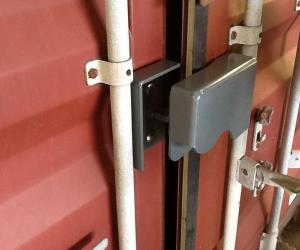
The lock box can be installed on any part of the door, but for security and accessibility we advise that it is installed on the lower half of the door. Before you mark the holes to drill make sure that both the left and right section of the lock box will fit in the desired area. Containers can be manufactured to different specifications, so each one may be a little different. For the purpose of this guide, the container with the lock box installed has low locking gear, so we were able to place it just under the center point of the door.
Using the stencil provided, or this downloaded PDF file, mark the right side of the door with the desired location of the bolts. The left side can be market later once the outside casing of the lock box is bolted on.

2. Drilling the Holes
Hold the drill level and apply gradual pressure to make the hole clean. In most containers there are two sections to the wall of the door. Keep this in mind so when the drill clears through the first section, it will move through the hollow interior and forward to the back partition.

3. Bolting on the Exterior Portion of the Lock Box
Push the bolts through the holes in the lock box, with the head of the bolts on the inside of the lock box, as the nut will be applied on the inside of the container. Using your wrench or socket fasten the nuts tightly.
4. Marking the Left Side Holes
Close the container doors and hold the left side of the lock box in place so that the shank fits through the opening of the exterior/right hand portion of the lock box. When both sides fit together smoothly, open the door and mark the holes for the left side of the lock box.

5. Drilling the Holes
Hold the drill level and apply gradual pressure to make the hole clean. In most containers there are two sections to the wall of the door. Keep this in mind so when the drill clears through the first section, it will move through the hollow interior and forward to the back partition.
6. Bolting on the Exterior Portion of the Lock Box
Push the bolts through the holes in the lock box, with the head of the bolts on the outside of the container, and the nut on the inside of the container. Using your wrench or socket fasten the nuts tightly.
7. Close it and Lock It
You’re finished with mounting the lock box. You should now be able to close the doors and lock the container securely.
